

November 30, 2012


November 29, 2012


November 28, 2012


November 27, 2012


AlchemyBro - Day 112
Experimenting. Sketch with a rock brush

On a layer above, stuck a photo of broken bits from a factory, set layer to Overlay. Controlled of where the bits show using a layer mask, filling the mask with black, then just revealing with white, no fancy brush, same rock brush. Pasted the same factory photo on a new layer over everything, flipped it vertical 180, set to Multiply, masked, revealed with white. No idea what I was hoping for, just that it's fuggin late and needed to submit something. Also wasn't expecting teeth.

Merged down image, made a copy, used history to go back to when it wasn't merged down, pasted on new layer above everything, set to Overlay, color balanced with the same color balance redness I use with all my waifu deliveries. Figured the guy needed more kawaii uguuu.

November 26, 2012


Tthal - Day 214

Edit :
Aaah, I'm so sorry it turned out all kind of derp. It just went tumbling down, tumbling down, tumbling down
(๑´_ゝ`๑)


November 25, 2012

Mature Adult - Day 220


AlchemyBro - Day 110
Was talking to T earlier about brush creation and it was like 'that sounds complicated.' It's pretty procedural after like a brush or 2 and with the stuff you make it can be applied to other images without any sweat.
To avoid wall of text, everything's been summed with a tl;dr.
1) Grab an image or a part of one

This is just a smattering of 2 minute sketches of cloud bits. From personal experience there's 3 things to keep in mind when taking an image to turn into a brush:
a) awkwardly-shaped silhouette are desired
b) awkwardly-shaped patterning within silhouette are desired
c) if you want a pattern brush, ignore the above two
A nice round stone is hard to turn into a useful random brush - it ends up looking like a clone stamp tool went on the fritz. It can be done, just takes a lot more effort and manipulation in the Brush screen. Weirdly shaped images are easier to turn into a brush, there's more extrusions to work with that literally make more random connections. If you want a pattern brush, though, use whatever you like: its the spacing under brush tip shape you'll be messing with to get it to work properly and that'll be explained further down.
tl;dr: weird shapes make good random brushes
Anyway, we'll be using the cloud bit that's lasso'd. just copy that, create new file, and paste.
2) Squaring new file canvas and cleanup
 So here we got that cloud sketch in the new file. The first step is to square the canvas. Note: NOT THE IMAGE SIZE. You want a square canvas as that's going to help with how the actual shape of the brush will look (ie it's going to be exactly what you copy-pasta'd) and will help with cleanup.
>Edit menu
>> Select 'Canvas Size'
>>> In popup window change the measurement units from 'Inches' to Pixels' in the dropdown menu.
>>>> Make the canvas bigger than what it is. ie, if Height is your largest dimension and it's something like 1145 Pixels, bump it up. to 1200, then bump your width to 1200. Likewise if your Width is largest and its 1864, bump it and height up to 1900 pixels in size. In other words.
tl;dr : Make sure your canvas is square and larger than the image you copy pasta'd.
3) Cleanup, merge down, and check up
 First off, you don't want your brush to have bits and pieces you can't see screwing up its shape. Take an erase tool and clean up the edges of the image. Afterwards, merge down (ctrl + e) onto the white background, and then check if everything is clean by inverting the image (ctrl +i). You want to make sure there's no white where you don't want it. If it looks clean, invert the image again to get back to how it used to look like.
tl;dr: erase dirt off your image, merge down onto background layer, and use the invert image (ctrl + i) to check if it looks clean or not.
4) NEW BRUSH
 >Edit Menu
>> Define Brush Preset...
>>>Just say ok, don't even rename it since it'll be deleted later.
Painless, right?
5) Testing
So on a new big canvas (or wherever you lasso'd your brush shape from) create a new layer. Select your new brush (here it's called Sample Brush 1) and just scribble
 Looks like crap, ya? Anyway its time to manipulate the frack out of this in the brush menu (F5 is hotkey)
 First off, I have Opacity and Flow in menu at the top of the screen set to 50% each and airbrush is on. We're making clouds here so we're going for a bit of fade. The image is a 10 second scribble after turning on Shape Dynamic and Scatter on the Brush Screen. I'm only using black and white here, so shades and bright spots were done by pressing the X key to switch colors. This is all just testing how it'll look.
Anyway, that's it.
No seriously, you can say done at this point. But it's always good to mess around with it even further, especially when you want your brush to do more refined tricks.
Brush Tip Shape: The part you want to mess with is the Spacing. Self explanatory: more space means your image is repeated further away from each other, less space, more overlap. If you're making a pattern brush like lace, adjust the spacing to be around 90-100%; you want some overlap so it isn't disjointed. There's also angle and roundness, but that's pretty self explanatory and you don't always need to mess with it.
 Shape Dynamics Menu
Size Jitter: whether everything you do is same size, or if the size should grow or shrink. If it's off, increasing the Size Jitter above 0% just tells PS to randomly change size with that percentage as a floor amount, ie set it to 60%, and the size of your marks will randomly be between 60-100%. Set it to 42%, and your marks will randomly be 42-100% in size variation. Turning on Pen Pressure here is preferred, feels more like a pencil.
Angle Jitter: Whether your brush should rndomly angle itself or not. Same as Size Jitter, the slider is there to say you want angles to Turn at least 42% or 58% or 360 degrees. Set this to Direction if you want something stringy to maintain stringiness, or just turn it off and use the slider if you want to add randomness to your stroke. Angle jitter set to direction is necessary if you want to make a pattern brush.
Roundness Jitter: Turning this on means your strokes can range from Momiji level of flat to full robust shapeliness.To make the most of this menu, increase the Minimum Roundness so you don't suddenly populate your picture with pancakes.
Scatter Menu is self explanatory. Just mess around with it and keep making strokes until you get a balance you like.
Now we're done.
 So this was done with a quick blue-white gradient fill on a bottom layer and the scribbling with the cloud brush set to white on an above layer. No joke, the clouds were done in 20 seconds tops using the brush just made - just randomly scribbled on the canvas and adjusted the Flow to something lower during the sketch.
tl;dr: turn on brush menu (F5), turn on Shape Dynamic and Scattering (or whatever else you feel like) and mess with the sliders and drop down menus and keep making new strokes until you get something cool.
6) Saving Your Real New Brush
 This step is important: if you switch to a new brush without saving, you'll have to mess with the brush menu and fix your sample brush again.
>Brush Menu (F5)
>>Click on the notepad looking button below the X at the upper right to bring out a new menu
>>>Click New Brush Preset
>>>Name it this time. This is your new, fancy brush. I like to unclick the 'Capture brush Size in Preset' so my brush size doesn't suddenly jump up.
tl;dr: save your new brush in the brush menu or this entire process will be erased when you switch brushes.
And that's it. Might also want to save your brush set, just do similar steps done in step 6, but in the Brush Preset window.
To avoid wall of text, everything's been summed with a tl;dr.
1) Grab an image or a part of one

This is just a smattering of 2 minute sketches of cloud bits. From personal experience there's 3 things to keep in mind when taking an image to turn into a brush:
a) awkwardly-shaped silhouette are desired
b) awkwardly-shaped patterning within silhouette are desired
c) if you want a pattern brush, ignore the above two
A nice round stone is hard to turn into a useful random brush - it ends up looking like a clone stamp tool went on the fritz. It can be done, just takes a lot more effort and manipulation in the Brush screen. Weirdly shaped images are easier to turn into a brush, there's more extrusions to work with that literally make more random connections. If you want a pattern brush, though, use whatever you like: its the spacing under brush tip shape you'll be messing with to get it to work properly and that'll be explained further down.
tl;dr: weird shapes make good random brushes
Anyway, we'll be using the cloud bit that's lasso'd. just copy that, create new file, and paste.
2) Squaring new file canvas and cleanup

>Edit menu
>> Select 'Canvas Size'
>>> In popup window change the measurement units from 'Inches' to Pixels' in the dropdown menu.
>>>> Make the canvas bigger than what it is. ie, if Height is your largest dimension and it's something like 1145 Pixels, bump it up. to 1200, then bump your width to 1200. Likewise if your Width is largest and its 1864, bump it and height up to 1900 pixels in size. In other words.
tl;dr : Make sure your canvas is square and larger than the image you copy pasta'd.
3) Cleanup, merge down, and check up

tl;dr: erase dirt off your image, merge down onto background layer, and use the invert image (ctrl + i) to check if it looks clean or not.
4) NEW BRUSH

>> Define Brush Preset...
>>>Just say ok, don't even rename it since it'll be deleted later.
Painless, right?
5) Testing
So on a new big canvas (or wherever you lasso'd your brush shape from) create a new layer. Select your new brush (here it's called Sample Brush 1) and just scribble


Anyway, that's it.
No seriously, you can say done at this point. But it's always good to mess around with it even further, especially when you want your brush to do more refined tricks.
Brush Tip Shape: The part you want to mess with is the Spacing. Self explanatory: more space means your image is repeated further away from each other, less space, more overlap. If you're making a pattern brush like lace, adjust the spacing to be around 90-100%; you want some overlap so it isn't disjointed. There's also angle and roundness, but that's pretty self explanatory and you don't always need to mess with it.

Size Jitter: whether everything you do is same size, or if the size should grow or shrink. If it's off, increasing the Size Jitter above 0% just tells PS to randomly change size with that percentage as a floor amount, ie set it to 60%, and the size of your marks will randomly be between 60-100%. Set it to 42%, and your marks will randomly be 42-100% in size variation. Turning on Pen Pressure here is preferred, feels more like a pencil.
Angle Jitter: Whether your brush should rndomly angle itself or not. Same as Size Jitter, the slider is there to say you want angles to Turn at least 42% or 58% or 360 degrees. Set this to Direction if you want something stringy to maintain stringiness, or just turn it off and use the slider if you want to add randomness to your stroke. Angle jitter set to direction is necessary if you want to make a pattern brush.
Roundness Jitter: Turning this on means your strokes can range from Momiji level of flat to full robust shapeliness.To make the most of this menu, increase the Minimum Roundness so you don't suddenly populate your picture with pancakes.
Scatter Menu is self explanatory. Just mess around with it and keep making strokes until you get a balance you like.
Now we're done.

tl;dr: turn on brush menu (F5), turn on Shape Dynamic and Scattering (or whatever else you feel like) and mess with the sliders and drop down menus and keep making new strokes until you get something cool.
6) Saving Your Real New Brush

>Brush Menu (F5)
>>Click on the notepad looking button below the X at the upper right to bring out a new menu
>>>Click New Brush Preset
>>>Name it this time. This is your new, fancy brush. I like to unclick the 'Capture brush Size in Preset' so my brush size doesn't suddenly jump up.
tl;dr: save your new brush in the brush menu or this entire process will be erased when you switch brushes.
And that's it. Might also want to save your brush set, just do similar steps done in step 6, but in the Brush Preset window.
November 24, 2012


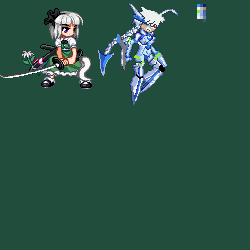
Mature Adult - Day 219
I'll start drawing again soon.
 Youmu is a reference by the way. I am nowhere near that good.
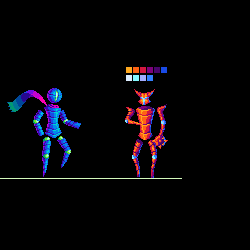
Update: Crap, I uploaded an older version of Nu. I redid her color but forgot to save over the png.
Here is the more updated one:
 also, while I'm adding stuff.. I did the coloring on the red guy as practice:
Update: Crap, I uploaded an older version of Nu. I redid her color but forgot to save over the png.
Here is the more updated one:
Subscribe to:
Posts (Atom)